Microsoft
NetMeeting 3.01 Setup Instructions
Microsoft
NetMeeting 3.01 Setup Instructions |
This
tutorial was created by NETcellent Systems Inc. to get you quickly started
using NetMeeting's Share Desktop feature.
This allows you to remotely access workstations via the Internet either
through phone line or through high speed connections.
Follow These
Steps:
1)
Install NetMeeting
Windows
2000 - NetMeeting 3.01 can be found already installed
on your computer. Start NetMeeting by clicking on Start, then Programs,
then Accesories, then Communications, run Netmeeting.
Windows
XP - You will need to
click on Start, then Run, then type "conf", and hit enter.
This will install NetMeeting for XP. After installation is completed
start NetMeeting by clicking on Start, then Programs, then Accesories,
then Communications, finally Netmeeting.
After installation, proceed to step 2 to configure it.
2)
Run NetMeeting
The
first time you run NetMeeting, you will need to step through
the prompts that appear. When prompted for your personal information,
at a minimum you must enter your first and last name and email address.
You may just enter an initial in the last name field if you prefer.
Next, you will come to a screen that asks if you want to log onto
a directory server when NetMeeting starts. You do not need to check
this box. There is also a checkbox labeled "Do not list my
name in the directory." This may be left unchecked as well.
Continue through the remaining prompts. When you come to the Audio
Tuning Wizard screen, you may choose to configure or not. It will
not be necessary to configure the audio of the microphone for our
purposes. Once you've finished configuring NetMeeting, it should
automatically launch. If you don't see NetMeeting on your screen,
click the Start Button, select Programs, and you should see the
NetMeeting icon.
3)
Make a call
To
make a call your pc must be already connected to the internet. Connect
to a tech support technician by entering an IP address (65.212.xxx.xxx)
provided to you. Enter this IP number in the number input field
(typically black in color) and click on the Phone icon to place
the call. You may also place a call by clicking on Call, then New
Call. Manually type the IP address in the "To:" field
then click Call. We can also connect to you unless your network
is behind a firewall. Once in a call, procede below to share your
desktop.
4)
Desktop Sharing
Click
the share program button or select "Sharing" under "Tools"
from the menu bar. The pop-up window lists all the applications currently
running on your computer. Select the program you want to share and click
the Share button, which is grayed out in the following figure because
it has been clicked, thus the program is being shared.
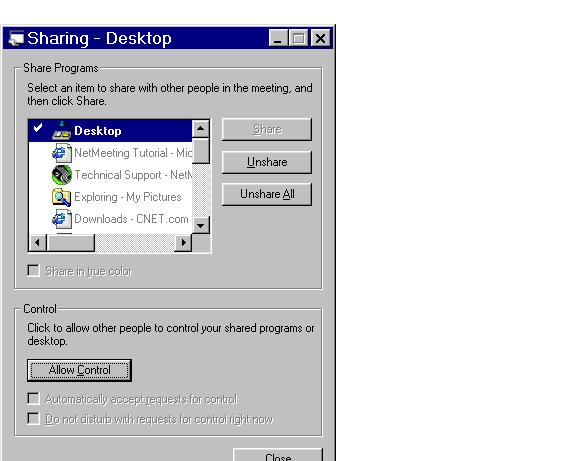
You
can click the Allow Control button to grant participants control of the
shared program, i.e. participants can edit the data in the shared program.
Participants will still need request data control if they want to edit
the data, and you grant control on an individual basis. If you'd like
to grant control to every participant, you can check the box "Automatically
accept requests for control".
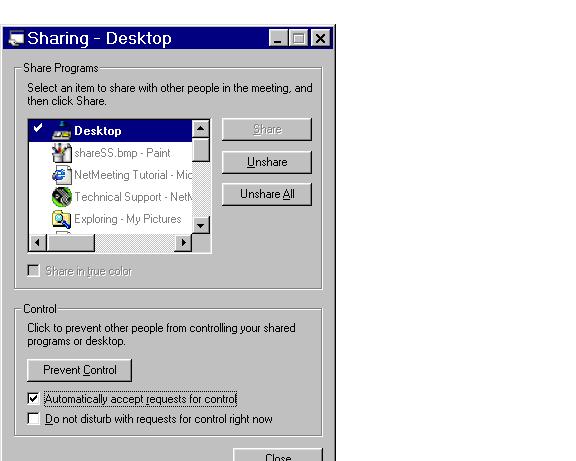
You
can change the program share setting any time during the session
by clicking the Unshare or Unshare All button.
Shared programs are
viewed in a frame, which makes it easy to distinguish between shared and
local applications on your desktop. You can minimize the shared program
frame and do other work if you do not need to work in the current conference
program. You can also choose to allow one person to work in the shared
program at a time.
Finished!
You
will find that we did not cover many of the features NetMeeting
has to offer. With continued use we're confident you will find NetMeeting
a useful tool to help with your tech support needs.
|